
Oh Christmas Tree, Oh Christmas Tree!

Merry Christmas Everyone!
So this year I wanted to sprinkle a little Christmas cheer throughout our home. I wanted to make something quick, fast, and in a hurry for little cost. So I thought about what I love most about Christmas decorations and what I love seeing this time of year and of course it's the Christmas tree!!
I knew that I could buy some styrofoam cones, but when I went to purchase them I ended up with over $50 worth and still needed to buy trim!! YIKES!!!! Ummm, no thank you. Even with my 40% and 50% off coupons I would still end up paying way more than what I wanted. So I thought, what could I use that would give me the same look for little money and the lightbulb went off - Poster Board!! I picked the heaviest weight they had that still had enough flexibility to roll. I purchased three sheets for less than $12 total. I also picked up some sparkly and fluffy trim to wrap around my soon to be Christmas rolls.
Folks let me tell you, for less than $30 for all my supplies I ended up with nine lovely little trees in varying heights, textures, and colors. Just makes my heart sing.So if you are looking for some quick and easy decorations to liven up your home or to serve as table centerpieces for this holiday season, please consider making these. They take less than 10 minutes each to make.
What You Need Poster Board Trim Hot Glue Gun Scissors
How To Make Cut triangle shapes using your poster board. Cut the bottom of the triangles in a curved shape instead of flat and straight. Roll the poster board until you have a point at the top. Hot glue or tape along the seam. From the bottom up, wrap your trim around your cone shape. Use hot glue at the beginning and end of your trim wrap.
There you have it folks!! I am sure it will turn out to be something PURTTTYYYYY like the ones below.


From our family to yours, Merry Christmas and Happy New Year!
Making Home, Home! Kathleen
From Granny Classic to Modern Graphic: Ottoman UpDo 2
 Upholster Something I Just Bought? Say What Now?
So a few days back I posted Ken's Bachelor's Pad which showed those awesome ottomans covered in a modern graphic fabric. Well here is a little secret, they looked nothing like that when I purchased them. You heard me right, purchased them!!
They actually looked like this! YIKES...OUCH...Can you say Grandmaaaaaa!!!!!! And I'm talking Grandma from back in the day folks (when furniture was covered in plastic and you couldn't sit on it because it was in the fancy living room that no one was allowed to go in), not like the little hot grandmas of today! =))

Now typically I don't mind DIY projects if it's something old or something that needs a little TLC, but to modify something completely brand new... GASP!!!! I have never been a - buy new and then do some work to it type of girl.
Side Note...nothing drives my husband more crazy than DIY projects and DIY projects of items I just bought from the store - that's just something he can't fathom, and ummm...I can't either sometimes.
But he knows by now when I'm determined, I'm determined. He also knows that the end result is going to be great (or at least that's what he tells me). So he takes a back seat to my madness and waits for the finale. =)) Love you hun if you are reading this.
With these ottomans I thought, how awesome would they be had they been done like this (use imagination). So this time, I stepped outside of my rationale self, thought nothing of the head shaking I knew I would receive from my husband (even though I was spending Ken's money and not ours), and I went with my gut...which never fails me folks, NEVER!
I purchased these babies at a big box store for a few reasons: 1. The scale, shape, and style were all perfect for this space. 2. They were built pretty solid. 3. I knew with a little imagination they would be beyond awesome.
Recovering the Ottomans To liven up these soon to be beauties, I removed the tufted buttons and the granny fabric.

Because Ken's space was grays and golds, I knew I wanted to warm the space up a little with some natural tones. I had a side table I scored for $5 years ago (that I knew would work in somebody's space one day) that was a nice walnut color and I wanted to bring that warmth to these ottomans, especially since they would reside in the center of the space. As you can see the legs were painted a pale, blond color originally. So I sanded them to remove the top coat of sheen and pulled out my paint brush. I painted the legs with a nutty brown color. Believe it or not, I did not prime the legs at all. The pale, blond color worked in my favor helping me achieve the look I was after. The original color created the highlights you see below. The result was nothing short of magnificent (at least in my opinion =)). The legs look like they have really been stained!! YESSSS!!!!!

Next I had to fill the holes made by the tufting since the tops would be completely flat. I had some foam left over from a previous project, so I cut little pieces from it and stuck them in the ottoman holes. I then wrapped the whole ottoman in batting to smooth out the tops and add a little extra cushion. Sorry I don't have a pic of this step. I was too excited and eager about wrapping them in the fabric. Lastly, I wrapped them in a citrusy, modern graphic fabric centering the print on both ottomans. I made sure the edges were as smooth as I could them and then worked my way around the bottom of the cushion stapling the fabric in place.Now check these babies out!! My husband could not believe how great they turned out. He is now a believer of As for my lucky apartment dweller Ken, he saw a picture of the ottomans when I purchased them, but I kept the fabric and the final look of the ottomans top secret until installation day. I wanted to surprise him. He could not believe they were the same ottomans.
 |
| Pay no attention to the shreds folks!! =)) |
Just goes to show you that with a little imagination and elbow grease, you really can make new even better. Now get out there and find you some almost awesome ottomans and get busy turning them into something magnificent.
Making Home, Home!
Kathleen
Small Space, Big Style: ATL Bachelor's Pad Reveal
I was elated to hear from one of my former clients (Ken B.) telling me that he was relocating from North Carolina to Atlanta. While in North Carolina I helped him decorate his single-family home and also painted some custom art pieces. In the middle of his project, we received word of an opportunity for my husband to relocate to Atlanta for his job and after much thought we decided to take it. After sharing the news with Ken and discussing how to keep his project moving along, he said those three little magic words every decorator wants to hear...I TRUST YOU!! So to keep his project on track, I assisted him via telephone, text, email, FaceTime - however we could communicate to make sure the job would get finished. It wasn't easy, but we got it done. PHEW!!
Because of how great our relationship has grown and how great that project turned out,I was secretly hoping that he would ask me to help him out again...I mean why wouldn't he, right??? Well guess what? He did and I happily accepted.
Side Note Ken has an excellent eye so I am recruiting him as my design assistant. I have made him well aware of this, but I think he thinks I'm kidding. Ummm sir...NOT!! And I'm trying to get him to be my personal stylist because these days my attire is really lacking. I can't seem to pull things together for the life of me. When I tell you this man has an eye for fashion!! He is really working in the wrong line of work...but I digress!! =))) Ken if you are reading this, you my dear are awesome!
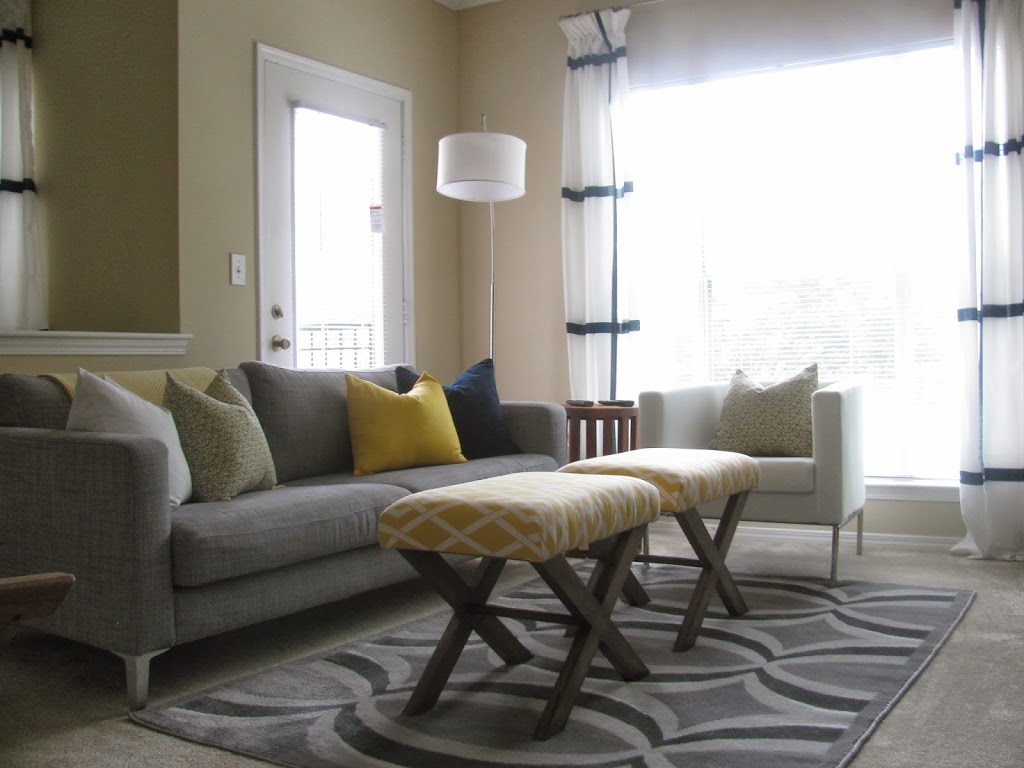
Back to the current room Now unlike before (1650 sq.ft of space in the single-family home), Ken decided to downgrade into a 800 square foot apartment - YIKES - and he sold just about all his stuff from his previous home which was full of great things...SIGH!!! I was slightly devastated to because had I known about this (I think he kept me in the dark on purpose so he wouldn't have to hear my mouth about it) I would have hit him up for some stuff!! So the hunt was on for new and maybe old, functional, and fresh items that would work double duty in this small space.
His Needs Urban, Fresh, and a Pop of Color. He stated the budget and said I trust you, do your thing - and that is exactly what I did!!
So here is what I had to work with initially: 1. Low profile bookcases he kept from the old home that we could use as the television/media console 2. Single lonely lamp 3. And the custom art I painted for his previous home (which I didn't want to use at first, but he insisted and now I'm glad we used them)
Major Purchases 1. A low profile sofa that wouldn't intrude to much into the space, but provide ample seating 2. More lighting 3. Side chairs 4. Ottomans (recovered to look great) 5. Window panels 6. Some accessories (he had some things I thought I could use)
The Room The creamy palette lended itself to be the perfect backdrop for what I wanted to do. For some reason here lately I am loving cream or white walls. I feel it gives me extra room to play a little more with color in the textiles and accessories.
Check out the space before...drab, drab, drab...
Before Pics (After the Purchase of the Sofa)


After Pics (KMC Customs - Art, Pillows, Ottomans)


Remember He Said Urban, Fresh, and a Pop of Color. So to make this happen:
1. Urban - Clean lined furnishings, low profile on everything - gives it a more modern, urban flare 2. Fresh - Not cluttered with furniture - just enough to provide the right amount of seating, accessories do not over power the room, and similar color story in rug and big furniture items 3. Pop of Color - Taken from the golden yellows in the art work - the ottomans and pillows add that element of pop
There is nothing like seeing everything come together the way you envisioned it and your client loving it just as much as you do. I absolutely love the way this space turned out and seeing Ken's face at the reveal was priceless.
Have an awesome day y'all and thanks for stopping by!
Making Home, Home! Kathleen
DIY: Spruce Up Your Cardboard Letters

Previously I posted Project: Children's Playroom which showcased a DIY project using paper mache' (cardboard) letters. Some of you may have already seen the DIY letters around the blogs or on Pinterest. But just in case you haven't and you are interested in creating these for one of your spaces, below is my take on how to turn these basic little letters into something special and it is super easy to do!
For this project you will need:
1. Letters (obviously =)) 2. Some crochet yarn (of your choice) 3. Hot glue gun 4. And a couple of hours (as easy as it is, wrapping these big ol' letters takes time)
Of course I headed to JoAnn Fabrics with my 50% coupons in tow to pick up my letters and yarn. And an FYI, JoAnn's will take multiple coupons in one exchange and they accept competitors coupons also. Saving some dollars! Isn't that just awesome?!! Another great thing is that JoAnn's carries these letters in different sizes. I have not found this at any other crafting store.
So to begin, I opted for the largest size letters because of the high ceiling height in the space. These letters are 23.5" tall, so they vertically fill up wall space nicely.

Next, I began to wrap the letters from the top down to the corner, color blocking my yarn. I started with the purple yarn. Because of the shape of the N and because I was color blocking, I had to overlap the purple yarn. I found the inner curves and the corners to be the trickiest because I had to keep everything nice and tight. The curves on this N were challenging because it met with an inner corner. I had to almost squeeze the two sides of yarn into the same tight little area.
I'm not sure how I would do this differently if I had to do it again, especially if working with another N or an M (or a letter similar in shape). If you have any suggestions, I would love to hear them!

When wrapping the yarn around the letters I did not hot glue each yarn wrap. I placed a bead of hot glue at the beginning of each color block of yarn and at the end of the color block. I made certain to firmly pull the yarn around the letter and adjust each yarn wrap to tightly sit under the previous wrap.

In the case of the J - since the it was rounded on the end and not square like the N, closing the yarn wrap required me to loop it around like a swirl. Sorry the pic isn't as clear as the others. Not sure what happened here! =/ Hopefully you all can see exactly what I'm talking about!

That's about it! A super easy DIY project for you to try! The finished letters!!

Thanks for stopping by! Have an awesome weekend!
Making Home, Home! Kathleen